Security Hardening Guide
This article took a lot of effort to summarize. It may not be extremely technical, but it was very time-consuming to organize.
For security service friends, just use Ctrl + F and search for whatever you forget.
Security Hardening Concepts
Definition of Security Hardening
Security hardening and optimization are key steps in achieving information system security. Through security hardening, the network layer, host layer, software layer, application layer, and other layers of an information system are configured into a secure state that meets security requirements. This becomes the starting point for ensuring the security of the customer's information system.
Security hardening is the process of configuring software systems. For server operating systems, databases, application middleware, and similar software systems, methods such as patching, strengthening account security, hardening services, modifying security configuration, optimizing access control policies, and adding security mechanisms are used to close vulnerabilities and backdoors, reasonably improve security, improve robustness and security, increase the difficulty of attacker intrusion, and raise the system's security protection level.
Why Security Hardening Is Needed
The software and hardware required by application systems often have the following security issues:
- Installation and configuration do not meet security requirements.
- Parameter configuration is incorrect.
- Usage and maintenance do not meet security requirements.
- System integrity has been damaged.
- Trojan programs have been injected.
- Account/password problems.
- Security vulnerabilities were not patched in time.
- Abuse of application services and applications.
- Security problems in application development.
Security Hardening Content
- Correct installation.
- Install the latest and complete security patches for the OS and application software.
- Secure configuration of the operating system, system software, and application software.
- System security risk prevention.
- Provide recommendations for system usage and maintenance.
- System function testing.
- System security risk testing.
- System integrity backup.
- Rebuild the system when necessary.
Security Hardening Goals
The hardening goal determines the security level reached by a system after hardening and optimization.
- Resolve technical security issues found in the target system during security assessment.
- Optimize system performance configuration and eliminate weaknesses caused by improper configuration.
Different environments usually have different security-level requirements, so the hardening plans used are also different.
Security Hardening Principles
The result of defining hardening goals must clearly show how the hardened and optimized system balances functionality and security.
- Patching and hardening must not affect business operations hosted on the target system.
- Patching and hardening must not seriously affect the target system's own performance.
- Patching and hardening operations must not affect the security of the target system or other connected systems, and must not cause obvious performance degradation.
Security Hardening Baseline Content
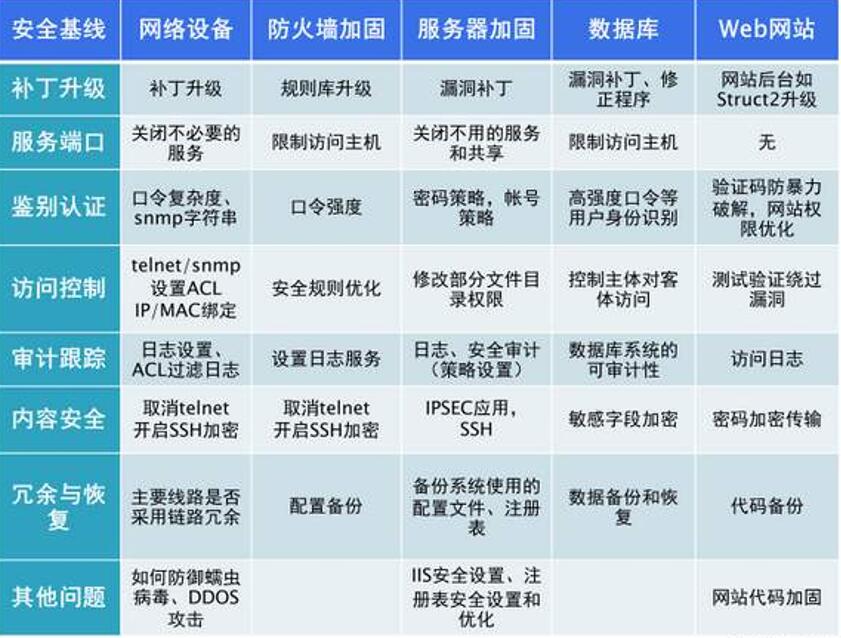
System Hardening
Windows System Security Hardening
Common Windows System Commands
| Command | Description |
|---|---|
| ver | View system version |
| hostname | View hostname |
| ipconfig /all | View network configuration |
| net user/localgroup/share/config | View users, groups, shares, and configurable services currently running |
| at | Create or view system jobs |
| netstat | View open ports |
| secpol.msc | View and modify local security settings |
| services.msc | View and modify services |
| eventvwr.msc | View logs |
| regedit | Open registry |
| whoami | View the username of the current operating user |
Common Windows Ports
| Port | Description |
|---|---|
| 80/8080/8081 | Common ports for HTTP proxy servers |
| 443 | Common port for HTTPS proxy servers |
| 21 | Common port for FTP |
| 23 | Common port for Telnet remote login |
| 22 | SSH secure login and SCP file transfer |
| 1521 | Oracle database |
| 1433 | MS SQL Server database |
| 1080 | |
| 3306 | MySQL database |
| 25 | SMTP |
Windows Accounts and Security Policies
Account security is the first gate for computer system security. If a system account is stolen, the computer is in serious danger. An intruder can freely control the system. If important confidential files, bank card numbers, or passwords exist on the computer, the loss can be severe.
Account security settings
Configuration method: Start -> Run -> enter secpol.msc (Control Panel -> Administrative Tools).
Take effect immediately: gpupdate /force
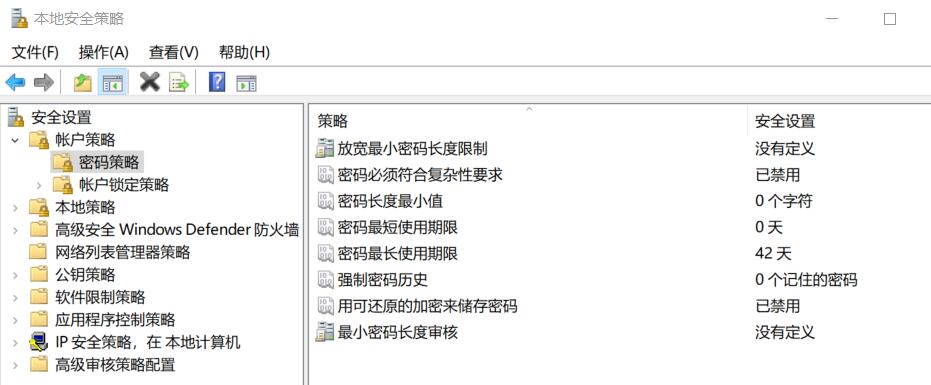
Account policy
Password must meet complexity requirements: enabled.
Minimum password length: 8 characters.
Maximum password age: 30 days.
Enforce password history: remember 3 passwords.
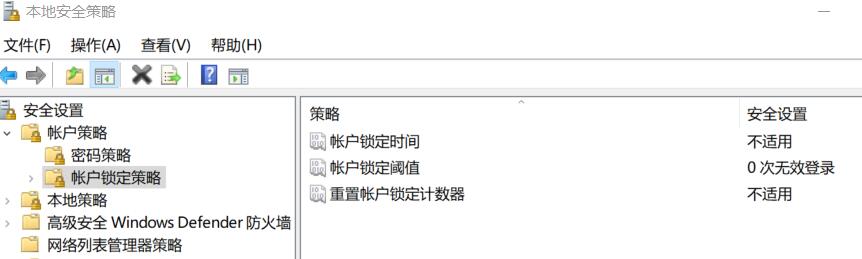
Account lockout
Account lockout threshold: 3 invalid logins.
Account lockout duration: 30 minutes.
Reset account lockout counter after: 30 minutes.
Account password policy
Account lockout policy
Rename the Administrator Account and Group
Renaming the Administrator account and group can increase account security.
wmic useraccount where name='Administrator' call Rename admin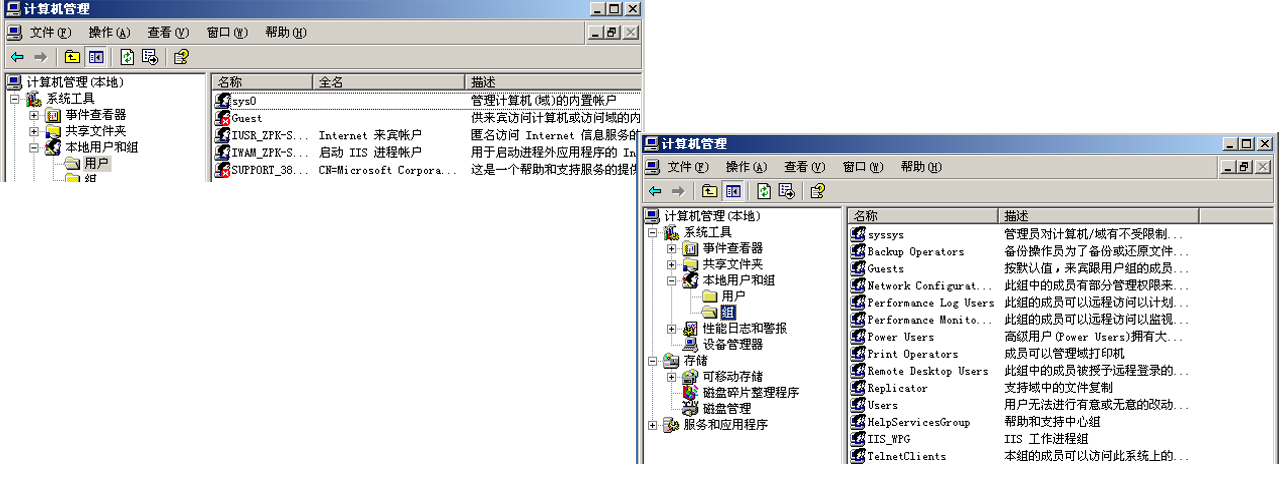
Disable Guest Account Permissions
Right-click My Computer -> Manage -> Computer Management -> Local Users and Groups -> Users -> Guest -> right-click -> Properties -> General -> select "Account is disabled".
net user guest /active:noLogs and Audit Policies
In a complete information system, the logging system is a very important functional component. It records all behavior generated by the system and expresses it according to a certain standard. We can use the recorded information to troubleshoot the system, optimize performance, or adjust system behavior. In security, logging is even more important and can be considered one of the main tools for security auditing.
Audit and record important events so root causes can be found later when problems occur.
Audit policies:
Audit policy changes          Success, Failure
Audit logon events            Success, Failure
Audit object access           Failure
Audit directory service access Failure
Audit privilege use           Failure
Audit system events           Success, Failure
Audit account logon events    Success, Failure
Audit account management      Success, Failure
Adjust Event Log Size and Retention Policy
Log security settings:
Configuration method: Start -> Run -> enter eventvwr.msc.
Increase log size to avoid missing important log records because log files are too small.
Log type       Log size   Retention policy
Application    80000KB    Overwrite logs older than 30 days
Security       80000KB    Overwrite logs older than 30 days
System         80000KB    Overwrite logs older than 30 days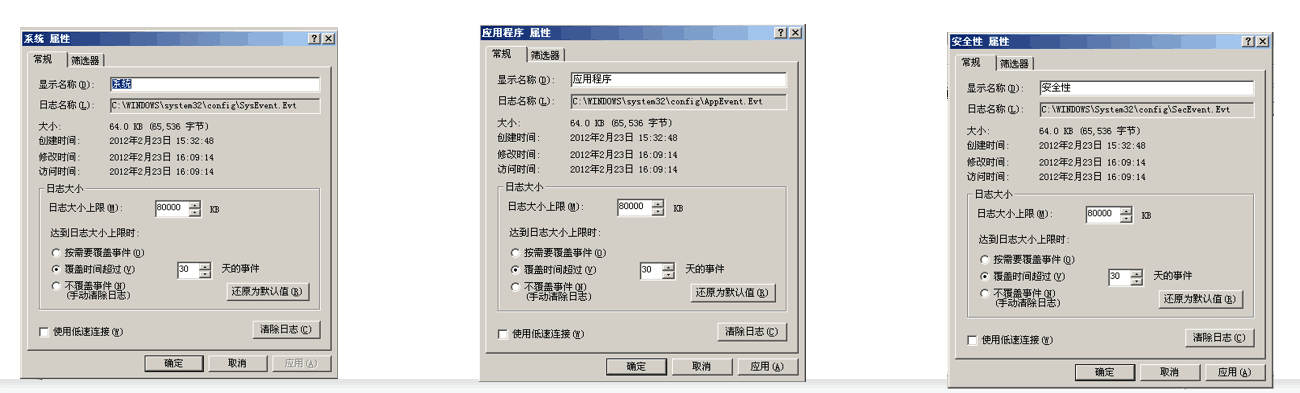
Security Options Policy Settings
Local Security Policy -> Local Policies -> Security Options
- Microsoft network server: log off users automatically when logon hours expire (enabled).
Purpose: prevent users from logging in at inappropriate times, or forgetting to log out after logging in.
- Microsoft network server: idle time required before suspending session (less than or equal to 30 minutes).
Purpose: set the idle time before suspending a session to 30 minutes.
- Microsoft network client: send unencrypted password to third-party SMB servers (disabled).
Purpose: prohibit sending unencrypted passwords to third-party SMB servers.
- Recovery Console: allow floppy copy and access to all drives and folders (disabled).
Purpose: prevent access to all files and directories on hard drives. It only allows access to the root directory of each volume and the %systemroot% directory and subdirectories, and even then it restricts copying files from hard drives to floppy disks.
- Recovery Console: allow automatic administrative logon (disabled).
Purpose: the Recovery Console is a Windows 2003 feature that provides restricted command-line access on a system that cannot boot. It may allow anyone who can restart the system to bypass account password restrictions and other security settings.
- Shutdown: clear virtual memory pagefile (enabled).
Purpose: some third-party programs may store unencrypted passwords in memory. The pagefile may also contain sensitive data. Clearing the pagefile at shutdown prevents accidental information leakage.
- Shutdown: allow system shutdown without logon (disabled).
Purpose: prevent shutting down the computer before login.
- Interactive logon: do not display last username (enabled).
Purpose: do not display the previous username during login, preventing username exposure.
- Interactive logon: do not require Ctrl+Alt+Del (disabled).
Purpose: require CTRL+ALT+DEL during login.
- Interactive logon: number of previous logons to cache (set cache count to 0; invalid for domain servers).
Purpose: do not display cached previous usernames and reduce exposure.
Network access: do not allow storage of credentials or .NET passports for network authentication (enabled).
Audit: shut down system immediately if unable to log security audits (enabled).
Audit: audit access to global system objects (enabled).
Network access: sharing and security model for local accounts: Guest only, local users authenticate as Guest.
Network access: anonymously accessible shares (delete all).
Network access: anonymously accessible named pipes (delete all).
Network access: remotely accessible registry paths (delete all).
Network access: remotely accessible registry paths and subpaths (delete all).
User Rights Policy Settings
- Add the Guests and Users groups to "Deny log on through Terminal Services".
- Add only the Administrators group to "Allow log on through Terminal Services".
- Remove PowerUsers and BackupOperators from "Access this computer from the network".
- Add web and guest users to "Deny log on locally".
NTFS Security
A filesystem, also called a file management system, refers to the software mechanism in an operating system responsible for managing and storing file information. It consists of file-management software, managed files, and the data structures required to implement file management. From a system perspective, a filesystem organizes and allocates file storage space, stores files, protects and retrieves stored files, creates files for users, stores, reads, modifies, transfers, controls access, and deletes files when no longer used.
Four basic principles of Windows permissions: inheritance, accumulation, priority, and intersection
Files and folders after Windows NT have the following permission characteristics: inheritance, accumulation, priority, and intersection.
Inheritance: lower-level directories inherit permissions from parent directories before being explicitly reset.
Accumulation: if a group GROUP1 has two users USER1 and USER2, and their permissions to a file or directory are "read" and "write", then GROUP1's access permission is the sum of USER1 and USER2's access permissions.
Priority: this includes two sub-characteristics. First, file access permissions take priority over directory permissions, meaning file permissions can override parent folder settings. Second, "deny" permissions take priority over all other permissions. Once "deny" is selected, other permissions have no effect, as if they were not set.
Intersection: when a folder has both share permissions and access permissions set for a user, and the permissions differ, the final permission is the intersection of the two, meaning the strictest and smallest permission. For example, if directory A has share permission "read-only" for USER1 and access permission "full control" for USER1, then USER1's final access permission is "read-only".
Permission Settings
System partition C drive                     administrator and system full control
C:\Documents and Settings\                   administrator and system full control
C:\windows\system32\                         administrator read/write
C:\progran files                             grant Administrators and SYSTEM full control to all directories except Common File
C:\windows                                   system administrator full control, system deny (inherited)
C:\windows\system32                          key programs allow only administrator full control
C:\Inetpub\                                  administrator and system full control; delete this directory if necessary
Disk where website directory resides          administrator and system full control
Registry Security Settings
Through the registry, users can easily add, delete, and modify software configuration information or hardware drivers in Windows. This makes it convenient to adjust system software and hardware working states, but the registry is also a target for attackers. Attackers can implant trojans, modify software information, or even delete, disable, or change hardware working state through the registry.
HKEY_LOCAL_MACHINE   Contains information about the local computer system, including hardware and operating system data.
HKEY_LOCAL_ROOT      Contains information technology and file association data used by various OLE technologies.
HKEY_LOCAL_USER      Contains environment variables, desktop settings, network connections, printers, and program preferences.
HKEY_LOCAL_USERS     Contains information about dynamically loaded user profiles and default profiles. Some information overlaps with HKEY_CURRENT_USER.
HKEY_CURRENT_CONFIG  Contains related information about the hardware profile used by the local computer system during startup.
Use file manager permissions to set regedit.exe so only administrators can use commands to access and modify the registry. Other users can only read and cannot modify it, preventing illegal users from maliciously modifying the registry.
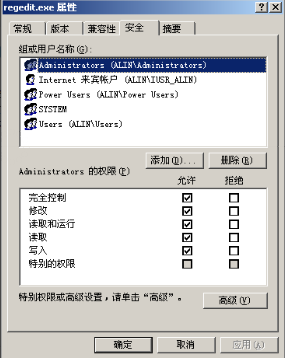
Open Run and enter regedit to start Registry Editor.
Disable Automatic Login
Edit registry key HKEY_LOCAL_MACHINE\Software\Microsoft\Windows NT\CurrentVersion\Winlogon\AutoAdminLogon (REG_DWORD) and set the value to 0.
reg add "HKEY_LOCAL_MACHINE\SOFTWARE\Microsoft\Windows NT\CurrentVersion\Winlogon" /v AutoAdminLogon /d 0 /fEnable Source Routing Spoofing Protection
Under System\CurrentControlSet\Services\Tcpip\Parameters\, create a REG_DWORD value named DisableIPSourceRouting with parameter 2.
reg add " System\CurrentControlSet\ Services\Tcpip\Parameters\ " /v DisableIPSourceRouting /t REG_DWORD /d 2 /fPurpose: protect against source routing spoofing on the network.
Disable Null Sessions
Delete IPC shares.
Disable IPC connections by editing HKEY_LOCAL_MACHINE\SYSTEM\CurrentControlSet\Control\Lsa\restrictanonymous and setting the value to 1.
reg add "HKEY_LOCAL_MACHINE\SYSTEM\CurrentControlSet\Control\Lsa" /v restrictanonymous /d 0 /fDelete System Default Shares
Delete administrator shares on the server.
Set HKLM\System\CurrentControlSet\Services\LanmanServer\Parameters\AutoShareServer to 0.
# View default shares
net share
# Delete a default share
net share <share_name> /del
Change the Default 3389 Remote Port
Modify the registry:
HKEY_LOCAL_MACHINE\SYSTEM\CurrentControlSet\Control\Terminal Server\Wds\rdpwd\Tds\tcp\PortNumber
Its default value is 3389. You can change it to a desired port number. Select decimal when modifying it.
reg add "HKEY_LOCAL_MACHINE\SYSTEM\CurrentControlSet\Control\Terminal Server\Wds\rdpwd\Tds\tcp" /v PortNumber /d 4445 /fClose Risky Ports 135, 139, and 445
- Close port 135.
Start -> Run, enter dcomcnfg, click OK, and open Component Services.
Right-click My Computer, click Properties, and in Default Properties uncheck "Enable Distributed COM on this computer".
Select the Default Protocols tab, choose "Connection-oriented TCP/IP", click OK, and restart to close port 135.
- Close port 139.
Right-click My Network Places, click Properties, then open Local Area Connection properties.
Select Internet Protocol (TCP/IP) -> General -> Advanced.
In the WINS tab, disable NetBIOS over TCP/IP.
- Close port 445.
Modify the registry and add a key value:
Under HKEY_LOCAL_MACHINE\SYSTEM\CurrentControlSet\Services\NetBT\Parameters, create SMBDeviceEnabled as REG_DWORD with value 0.
reg add "HKEY_LOCAL_MACHINE\SYSTEM\CurrentControlSet\services\NetBT" /v SMBDeviceEnabled /t REG_DWORD /d 0 /fMake Configuration Take Effect Immediately
- Take effect immediately after modification.
- Restart the
explorer.exeprocess to make registry modifications take effect. - Restart the computer.
Linux System Security Hardening
System Users
Account categories:
Super administrator       uid=0
System default users      used by system programs, never log in
New ordinary users        uid greater than 500
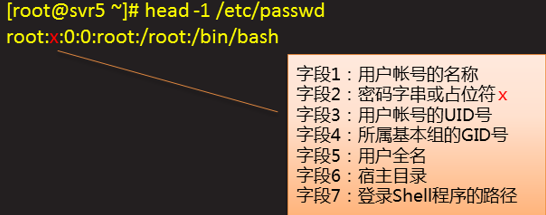
/etc/password
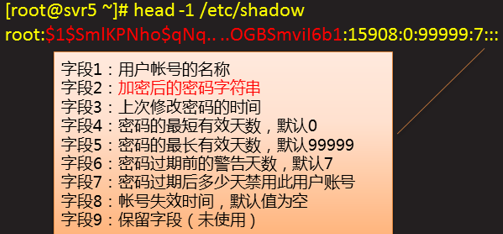
/etc/shadow
Linux user management
# Add user
useradd <username>
# Delete user
userdel [-r][-f] <username>

# Lock/unlock user
passwd -l <username>
passwd -u <username>

# User attributes
usermod -L  <username> lock user
usermod -U <username> unlock user

# View current user
id
Understanding File Permissions
Run ls -l .. .. to view.
The output contains 7 fields.

Permissions and Ownership
- Access permissions
Read: allow viewing content, -read.
Write: allow modifying content, -write.
Execute: allow running and switching, -excute.
- Ownership relationships
Owner: user who owns the file/directory, -user.
Group: group that owns the file/directory, -group.
Other users: users other than owner and group, -other.
All users: the above three ownership classes, -all.
Filesystem Security
View permissions:
  	ls -l
Modify permissions:
	chmod 777 test

	chown 123:123 test

	chgrp root test
Set Reasonable Initial File Permissions
UMASK command:
When the umask value is 0022, the default permissions for newly created files and folders are 644 and 755 respectively.
Folder permission rule: 777-022=755.
File permission rule: 777-111-022=644, because files do not have execute permission by default.
Modify UMASK:
- Run
umask xxxdirectly on the command line. This disappears after reboot. - Modify the umask value configured in
/etc/profile.
Linux Privilege Escalation Vulnerabilities
Because the Linux kernel memory subsystem has a race condition when handling Copy-on-Write, private read-only memory mappings can be damaged. After gaining read/write permissions, a low-privilege user can further escalate privileges.
- Check whether a kernel upgrade package exists:
yum check-update |grep kernel - Upgrade the kernel:
yum update kernel - Confirm whether the new kernel or initrd/initramfs has
xen-vbdandvirtio_blkdrivers:
#lsinitrd /boot/initramfs-2.6.32-642.6.2.el6.x86_64.img |grep -i -E 'xen-blkfront|virtio_blk' -rwxr--r-- 1 root root 23448 Nov 4 16:21 lib/modules/2.6.32-642.6.2.el6.x86_64/kernel/drivers/block/virtio_blk.ko -rwxr--r-- 1 root root 54888 Nov 4 16:21 lib/modules/2.6.32-642.6.2.el6.x86_64/kernel/drivers/block/xen-blkfront.koIf they are missing, install the drivers for initrd/initramfs, then reboot after completing step 3.
Lock Unneeded Custom Accounts
Run:
cat /etc/passwd
cat /etc/shadow
Check account and password files, and confirm unnecessary accounts with the system administrator. Some reserved system pseudo-accounts such as bin, sys, adm, uucp, lp, nuucp, hpdb, www, and daemon can be locked as needed.
Hardening method:
Use passwd -l <username> to lock unnecessary accounts.
Use passwd -u <username> to unlock accounts that need to be restored.
Check Empty-Password Accounts in shadow
Check method:
awk -F ":" '($2=="!"){print $1}' /etc/shadowHardening method:
# Lock unnecessary accounts
passwd -l <username>

# Unlock accounts that need to be restored
passwd -u <username>

# Set password for a user
passwd <username>
Configure System Password Policy
Run command:
cat /etc/login.defs|grep PASS  # view password policy settings
Hardening method:
vi /etc/login.defs and modify the configuration file:
	PASS_MAX_DAYS		90	   # maximum password age
	PASS_MIN_DAYS		0	   # minimum interval between password changes
	PASS_MIN_LEN		7	   # minimum password length
	PASS_WARN_AGE	9       # days before password expiration to start warning
Disable Superusers Other Than root
Detection method:
# Check users with user ID 0
awk -F ":" '($3=="0"){print $1}' /etc/passwd
Hardening method:
# Lock user
passwd -l <username>
Restrict Users Who Can su to root
# Check whether an entry such as auth required /lib/security/pam_wheel.so exists.
cat /etc/pam.d/su
Hardening method:
Add at the top:
auth required /lib/security/pam_wheel.so group=wheelThen only users in the wheel group can su to root.
# Add test user to the wheel group
usermod -G10 test
Add Immutable Attributes to Important Files
# Add immutable attributes to important files
chattr +i /etc/passwd
chattr +i /etc/shadow
chattr +i /etc/gshadow
chattr +i /etc/group
chattr +i /etc/inetd.conf
chattr +i /etc/httpd.conf
SSH Security
Disable Remote Login for root
Check method:
# Check whether it is no.
cat /etc/ssh/sshd_config | grep PermitRootLogin
Hardening method:
vi /etc/ssh/sshd_config
PermitRootLogin no
Change service port:
vi /etc/ssh/ssh_config
Port 2222				change SSH port
Hide SSH Login Banner Information
Check method:
# Check whether the banner field exists or is set to NONE.
cat /etc/ssh/sshd_config
# View file content. This content is shown as banner information to login users.
cat /etc/motd
Hardening method:
vim /etc/ssh/sshd_configAdd:
banner NONE
#vim /etc/motd
Delete all content or update it to whatever you want to display.
Allow Only SSH Protocol Version 2
There are two SSH protocol versions. Using only SSH protocol version 2 is more secure.
SSH protocol version 1 has security issues, including man-in-the-middle and insertion attacks.
Edit /etc/ssh/sshd_config and look for a line like:
Protocol 2,1Change it to:
Protocol 2Prevent Accidental Ctrl+Alt+Del System Reboot
Check method:
View whether the output line is commented.
cat /etc/inittab |grep ctrlaltdel
#ca::ctrlaltdel:/sbin/shutdown -t3 -r now
Hardening method:
vim /etc/inittabAdd # at the beginning of the line:
#ca::ctrlaltdel:/sbin/shutdown -t3 -r now
Configure Account Lockout Count and Time After Failed Logins
Check method:
cat /etc/pam.d/system-auth|grep authCheck whether an auth required pam_tally.so entry is configured.
Hardening method:
# Lock for 300 seconds after 6 consecutive password errors.
vi /etc/pam.d/system-auth
auth required pam_tally.so oneer=filad deny=6 unlock_time=300
Unlock user: faillog -u <username> -r
Modify Account TMOUT and Configure Automatic Logout
Check method:
# Check whether TMOUT is configured.
cat /etc/profile|grep TMOUT
Hardening method:
vim /etc/profileAdd:
TMOUT=600Automatically log out after 600 seconds of inactivity.
Configure How Many BASH History Commands Are Kept
Check method:
cat /etc/profile | grep HISTSIZE
HISTSIZE=1000
Hardening method:
vim /etc/profileChange to:
HISTSIZE=5This keeps only the latest 5 executed commands.
Delete command records when users log out.
Check method:
View /etc/skel/.bash_logout and add the following line:
rm -f $HOME/.bash_historyThis causes all system users to delete command history when logging out. If this should apply only to a specific user, such as root, modify /$HOME/.bash_history under that user's home directory and add the same line.
Configure System Log Policy File
The main uses of logs are system auditing, monitoring and tracing, and analysis statistics.
To ensure normal Linux system operation and accurately solve various system problems, carefully reading log files is an important administrator task.
UNIX/Linux uses the syslog tool to implement this function. If configured correctly, everything that happens on the host is recorded, whether good or bad.
Starting from CentOS 6, /etc/syslog.conf no longer exists; it is replaced by /etc/rsyslog.conf.
Check method:
ps -aef | grep syslog # confirm whether syslog service is enabled
cat /etc/rsyslog.conf # view syslogd configuration and confirm whether log files exist# System log (default)
/var/log/messages
# Cron log (default)
/var/log/cron
# Security log (default)
/var/log/securePrevent the System From Responding to Any External/Internal Ping Request
Hardening method:
echo 1 > /proc/sys/net/ipv4/icmp_echo_ignore_allOther clients will no longer be able to ping your server.
Middleware Hardening
IIS Hardening
IIS Installation and Version Selection
During IIS installation, install only the necessary components according to business requirements to avoid security risks caused by installing unnecessary components. For example, if a website only needs an ASP environment, there is no need to install .NET components. For the IIS version, use at least 6.0 or above. IIS 5.0 has serious security vulnerabilities, but servers still running IIS 5.0 are now rare, so this is less concerning.
Delete the Default Website
Delete or disable the site installed by default with IIS.
Disable Unnecessary Web Service Extensions
Open IIS Manager and check whether unnecessary "Web Service Extensions" exist. If so, disable them.

Delete Unused Application Extensions
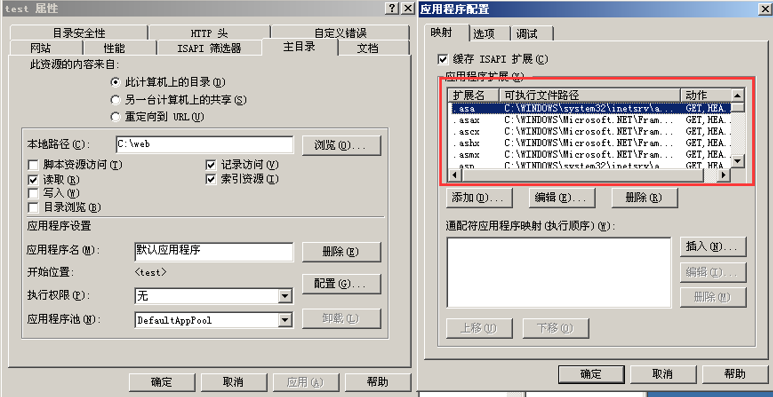
In IIS Manager, right-click the website, choose Properties, click the Home Directory tab, and click the Configuration button under Application Settings.
Based on the actual website situation, keep only necessary application extensions and delete all others, especially dangerous extensions such as cer and asa, which are usually unnecessary for normal websites.
IIS Access Permission Configuration
If there are multiple websites in IIS, configure a different anonymous access account for each website.
Method:
a. Create a new account and add it to the Guests group.
b. Website Properties -> Directory Security -> Authentication and Access Control. Replace the default account under "Enable anonymous access" with the newly created account.
Correctly Configure Website Directory Permissions and IIS Permissions
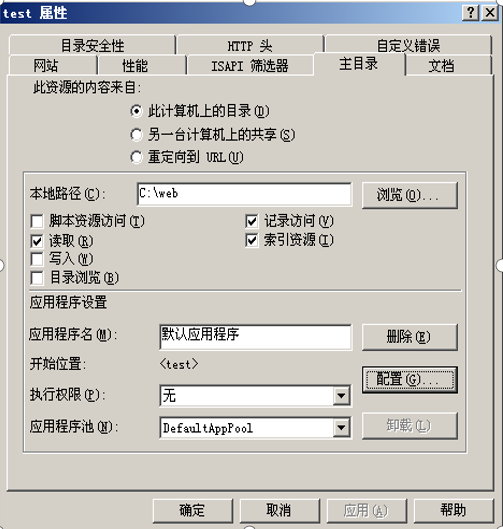
The website partition should be an NTFS partition. For the website directory, only the system and administrator groups should have full control. Other users only need read permission.
In IIS 6 Manager:
- Select only "Read", "Log visits", and "Index this resource".
- Disable "Write" and "Script source access" to avoid IIS PUT upload attacks.
- Disable "Directory browsing" to avoid directory traversal attacks.
Correctly Configure Website Directory Permissions and IIS Permissions
Set the execution permission in Application Settings to "Scripts only".
Principles:
- If a directory has write permission, do not assign execute permission.
- If a directory has execute permission, do not assign write permission.
- Website upload directories and database directories usually need write permission, but must not have execute permission.
- Other directories generally only need read and log access permissions.
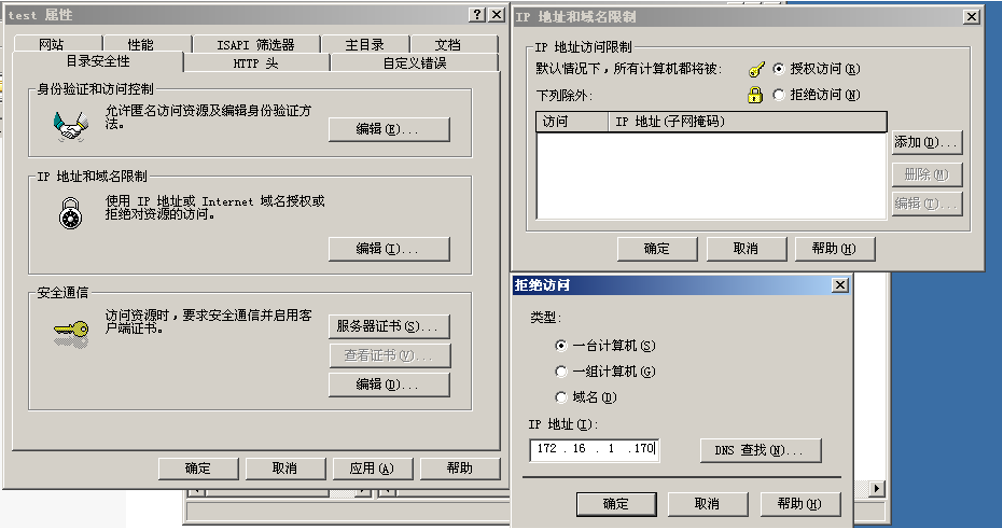
Configure IP Access Restrictions
Correctly Configure IIS Logs
In IIS Manager, right-click the website, choose Properties, click the Web Site tab, and confirm that "Enable logging" is selected. The active log format should be "W3C Extended Log File Format".
Then change the IIS log file storage path. By default, it is stored under C:\WINDOWS\system32\LogFiles; change it to a custom path.
It is recommended to store it on a non-system disk, and allow only the Administrators group and SYSTEM user to access the directory where IIS logs are stored.
Customize IIS Error Messages
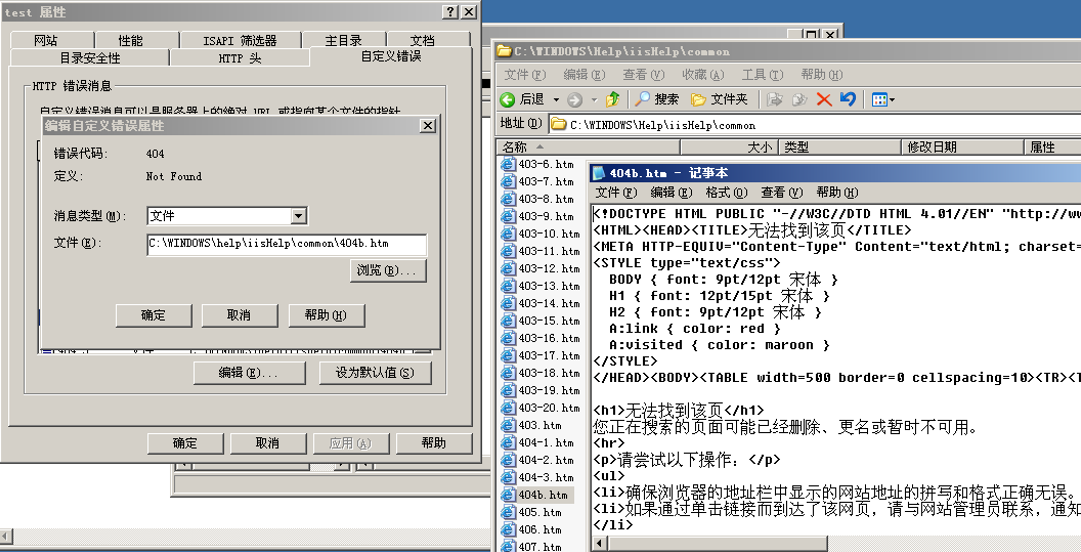
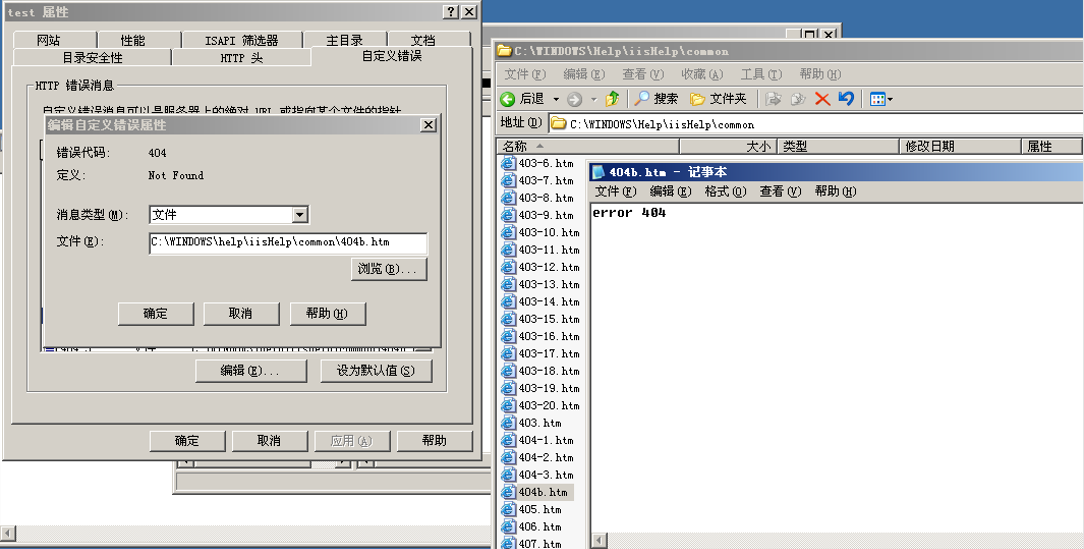
Do Not Send Detailed ASP Error Information to Clients
In IIS Manager -> Properties -> Home Directory -> Configuration -> Debugging, select "Send the following text error message to client" and customize the error message returned when errors occur.
Apache Security Hardening
Hide Apache Banner Information
vim /etc/httpd/conf/httpd.conf
# Do not display the server operating system name on error pages.
ServerTokens OS  change to: ServerTokens Prod
# Do not echo Apache version information.
ServerSignature On 	change to: ServerSignature Off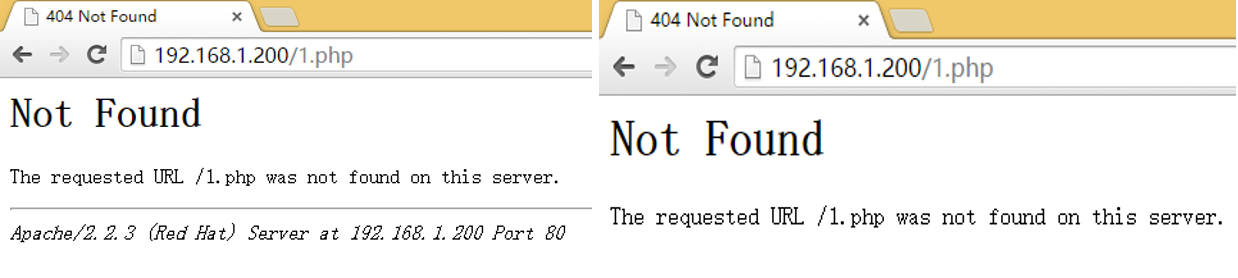
Disable Directory Browsing
Change:
Options Indexes FollowSymLinks
To:
vim /etc/httpd/conf/httpd.conf
Options  FollowSymLinks
Restrict IP Access
<Directory "/var/www/html/aa/">
    Options Indexes MultiViews FollowSymLinks
    AllowOverride AuthConfig
    AuthType Basic
    AuthName "testuser's paasword"
    AuthUserFile /usr/local/etc/passwd.httpd
    Require user testuser
    Order allow,deny
    Allow from 172.16.1.0
</Directory>
service httpd restartStop httpd: [OK]
Start httpd: [OK]Restrict Access to Forbidden Directories, Such as Backend Directories
<Directory "/var/www/html/33">
        Deny from all
</Directory>
Prevent Apache Parsing Vulnerabilities
Apache parses filenames from right to left until it encounters a file type it recognizes. Therefore, if a file named like
webshell.php.testexists under the web directory, Apache does not recognize.testand continues parsing backward. When it reaches.php, it recognizes the type and parses it as a PHP file.
This parsing behavior is often used to bypass file upload checks in web applications. If a web application validates uploaded files only by checking the extension, Apache's filename parsing behavior can be used to bypass that validation.
Prevent httpd from parsing files
Prevent httpd from parsing files such as index.php.jpg.
Add the following content to the httpd.conf configuration file to stop Apache from parsing this kind of file.
Modified configuration:
<FilesMatch \.php$>
    SetHandler application/x-httpd-php
</FilesMatch>
<FilesMatch "\.phps$">
    SetHandler application/x-httpd-php-source
</FilesMatch>
Error Page Redirection
Add the following content to the .htaccess file:
ErrorDocument 400 /custom400.html
ErrorDocument 401 /custom401.html
ErrorDocument 403 /custom403.html
ErrorDocument 404 /custom404.html
ErrorDocument 405 /custom405.html
ErrorDocument 500 /custom500.html Customxxx.html is the custom error page to set.
Restart Apache for it to take effect.
Log Settings
Edit the httpd.conf configuration file and set the log file, log content, and log format. Error log:
LogLevel notice				# log level
ErrorLog  logs/error_log 	# log storage location (error log)
Access log:
LogFormat %h %l %u %t \”%r\” %>s %b “%{Accept}i\”%{Referer}i\” \”%{User-Agent}i\””
combined
CustomLog  logs/access_log combined (access log)
In Apache httpd, diagnostic information and errors that occur while processing requests are stored in this file. To send the error log to Syslog, set
ErrorLog syslog. TheCustomLogdirective sets the filename and location of the access log. The access log records all requests processed by the server.
LogFormatsets the log format.LogLeveladjusts the detail level of information recorded in the error log. It is recommended to set it tonotice. Check the related log files in thelogsdirectory to ensure records are complete.
Denial-of-Service Prevention
Set a reasonable session time according to business needs to prevent denial-of-service attacks.
vim httpd.conf configuration file

Timeout 10 		# interval before client and server establish a connection
KeepAlive On
KeepAliveTimeout 15 # limit each session keepalive time to 15 seconds
Note: this is only a suggested value. The specific setting should be based on the actual situation.
Disable CGI
If the server does not need to run CGI programs, it is recommended to disable CGI.
Modify /etc/httpd/conf/httpd.conf and comment out the cgi-bin directory configuration and module.
#LoadModule cgi_module modules/mod_cgi.so
#ScriptAlias /cgi-bin/ "/var/www/cgi-bin/"
#<Directory "/var/www/cgi-bin">
AllowOverride None
#    Options None
#    Order allow,deny
#    Allow from all
#</Directory>
Prevent SQL Injection and Remote Inclusion
SQL injection is very dangerous. At best, the website backend is compromised; at worst, the entire server is compromised, so be careful.
There is a setting in php.ini:
magic_quotes_gpc = Off change to magic_quotes_gpc = OnIn remote file inclusion vulnerabilities, attackers can load remote code by accessing external addresses, so set:
allow_url_fopen = offNginx Server Security Hardening
Disable autoindex
Ensure autoindex is disabled in nginx.conf, meaning autoindex off is configured or autoindex is not configured.
Disable Server Tokens
If enabled by default, all error pages display the server version and information. Example nginx.conf configuration:
http{
    include       naxsi_core.rules;
    include      mime.types;
    default_type  application/octet-stream;
    sendfile        on;
    server_tokens off;
... ...
Also modify /usr/local/nginx/conf/fastcgi_params.
Change:
fastcgi_param SERVER_SOFTWARE nginx/$nginx_version;
To:
fastcgi_param SERVER_SOFTWARE nginx;
Custom Buffering
Configure custom buffering to limit buffer overflow attacks. Example nginx.conf configuration:
http{
    ... ...
    server{
        ... ...
        client_body_buffer_size  16K;
       client_header_buffer_size  1k;
        client_max_body_size  1m;
       large_client_header_buffers  4  8k;
Note: the parameters above are not optimal and are for reference only.
Timeout Settings
Set lower timeouts to defend against DoS attacks. Example nginx.conf configuration:
http {
    ... ...
       client_body_timeout   10;
       client_header_timeout  30;
       keepalive_timeout     30  30;
       send_timeout          10;
Configure Logs
Because the log output format has not yet been finalized, use the default Nginx log format for now. Example nginx.conf configuration:
http {
    ......
    log_format  main  '$remote_addr - $remote_user [$time_local]"$request" ''$status $body_bytes_sent "$http_referer"''"$http_user_agent" "$http_x_forwarded_for"';
    access_log logs/ access.log  main;
Restrict Methods
The current application system only uses POST and GET methods, so requests using other methods can be rejected.
Nginx.conf configuration:
server{
       ... ...
       if($request_method !~ ^(GET|HEAD|POST)$) {
                     return404;
              }
       ... ...
Restrict Access by IP
The ngx_http_access_module module allows restricting access from certain client IP addresses.
Example:
location/ {
    deny  192.168.1.1;
    allow 192.168.1.0/24;
    allow 10.1.1.0/16;
    allow 2001:0db8::/32;
    deny  all;
}
Note: rules are checked in order until the first matching rule is found.
In this example, only 10.1.1.0/16 and 192.168.1.0/24 are allowed in IPv4 networks, except 192.168.1.1.
For IPv6 networks, only 2001:0db8::/32 is allowed.
Integrate the Naxsi Module
Naxsi is an open-source, efficient, low-maintenance-rule Nginx web application firewall module. Naxsi's main goal is to harden web applications against SQL injection, cross-site scripting, cross-site request forgery, local file inclusion, and remote file inclusion vulnerabilities.
Step 1: download Naxsi.
https://github.com/nbs-system/naxsi
Note: if the server cannot access the internet, download it beforehand and upload it to the server.
For an open-source WAF, this is a preferred choice. Configuration and usage tutorials are everywhere online, so I will not reinvent the wheel here.
Database Hardening
MySQL Database Security Hardening
Delete Default Databases and Database Users
After MySQL initialization, empty users and the test database are automatically generated for installation testing. This threatens database security, so they should all be deleted. In the end, keep only a single root user. Of course, add users and databases later as needed.
mysql> show databases;
mysql> drop database test; 		# delete database test
mysql> use mysql;
mysql> delete from db;          # delete table information storing database data because no database information exists yet
mysql> delete from user where not (user='root');       # delete initial non-root users
mysql> delete from user where user='root' and password=''; # delete root users with empty passwords; repeat as needed
mysql> flush privileges; 		# force refresh in-memory grant tables
Do Not Use Default Passwords or Weak Passwords
Check accounts for default passwords and weak passwords. Password length should be at least 8 characters and include at least two of the following categories: numbers, lowercase letters, uppercase letters, and special symbols. The same password must not be reused within 5 changes, and passwords should be changed at least every 90 days.
Mysql> Update user set password=password(‘test!p3’) where user=‘root’;
Mysql> Flush privileges;
Detection:
Check local passwords. Note that the default management account root has an empty password by default.
mysql> use mysql;
mysql> select Host,User,Password,Select_priv,Grant_priv from user;
Change the Default MySQL Administrator Account
Changing the default MySQL administrator account can also improve MySQL database security, because the default MySQL administrator username is usually root.
mysql> update mysql.user set user='admin' where user='root';Run MySQL as an Independent User
Never run the MySQL server as the root user. This is very dangerous because any user with FILE permission can create files as root, such as ~root/.bashrc. mysqld refuses to run as root unless the –user=root option is explicitly specified. MySQL should run as an ordinary unprivileged user. Create a separate Linux mysql account for the database, used only to manage and run MySQL.
To start MySQL as another Linux user, add the user option under the [mysqld] group in /etc/my.cnf or the my.cnf option file in the server data directory.
vi /etc/my.cnf
[mysqld]
user=mysql
This command causes the server to start as the specified user, whether started manually or through mysqld_safe or mysql.server, ensuring it runs as mysql.
Disable Remote Database Connections
Use netstat to view that the default 3306 port is open. At this time MySQL network listening is enabled, allowing users to connect remotely to the local database with account and password. Remote database connections are allowed by default. To disable this feature, enable skip-networking, do not listen on any SQL TCP/IP connections, cut off remote access, and improve security.
vi /etc/my.cf # uncomment #skip-networkingLimit the Number of User Connections
Multiple remote connections from a database user can reduce performance and affect other users. It is necessary to restrict them. This can be done by limiting the number of connections allowed for a single account through the max_user_connections variable in my.cnf. The GRANT statement also supports resource control options to restrict server resource usage allowed for an account.
vi /etc/my.cnf
[mysqld]
max_user_connections=2
Command History Protection
Database-related shell commands are recorded in .bash_history. If these files are read accidentally, database passwords and database structure information may be leaked. Operations after logging in to the database are recorded in .mysql_history. If update is used to modify database user passwords, passwords may also be read. Therefore, delete these two files. When performing login, backup, or other password-related database operations, use the -p parameter to prompt for password input and enter the password hidden. It is recommended to empty the files above.
rm .bash_history .mysql_history	# delete history records
ln -s /dev/null .bash_history   # empty shell history file
ln -s /dev/null .mysql_history	# empty MySQL history file
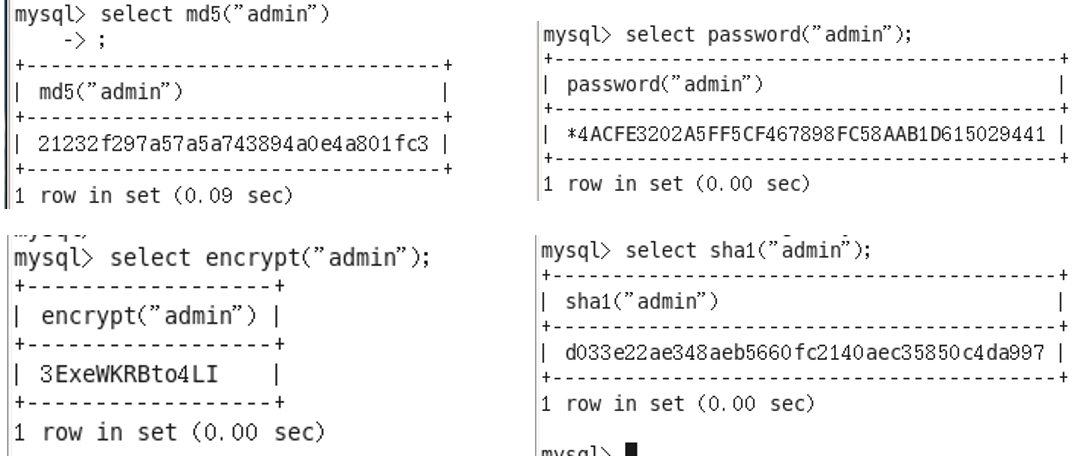
Encrypt Important Data Storage
MySQL provides four functions for hash encryption: PASSWORD, ENCRYPT, SHA1, and MD5.
INSERT INTO table1 (user, password) VALUE ('user1', MD5('password1') )
Local File Read Protection
Common attack: user has FILE permission.
create dababase use;
CREATE TABLE etc_passwd (pwd_entry TEXT);
LOAD DATA INFILE "/etc/passwd" into TABLE etc_passwd;
SELECT * FROM etc_passwd;
Prevent users from using LOAD DATA LOCAL INFILE to read local files on the server:
vim /etc/my.cnf
set-variable=local-infile=0
Logging
MySQL has the following logs:
Error log: -log-err
Query log: -log (optional)
Slow query log: -log-slow-queries (optional)
Update log: -log-update
Binary log: -log-bin
Open my.ini under the MySQL installation directory, append the parameters above, save, and restart the MySQL service.
Check
View the etc/my.cnf file and check whether it contains the following configuration:
[mysqld]
Log=filename
Database Recovery
mysql -u root -p [database_name] < /backup_path/backup_filenameSQL Server Database Security Hardening
Password Policy and Weak Passwords
Perform security checks on user attributes, including empty passwords and password update time. Modify the passwords of all current accounts to ensure they are at least 12 characters long, contain a mix of numbers, letters, and symbols, and have no obvious pattern. Do not use the default Windows password.
Specific Operation
Open SQL Server Management Studio, expand "Logins" on the left, right-click sa and other logins one by one to view properties, and check "Enforce password policy".
Communication Protocol Encryption
When remotely managing the server, use encrypted communication protocols to prevent authentication information from being eavesdropped during network transmission.
Specific Operation
SQL Server Configuration Manager -> SQL Server Network Configuration -> Protocols for MSSQLSERVER -> right-click -> Properties -> Flags.
Set "Force Encryption" to "Yes".
Restrict guest Account Access to Databases
Remove guest account access permissions for databases other than master and tempdb.
- Method 1: open SQL Server Management Studio, expand all databases except
masterandtempdbon the left -> Security -> Users, and delete theguestaccount. - Method 2: use commands to remove
guestaccess to a specified database:use database_nameexec sp_revokedbaccess guest
Configure Authentication
Separate privileges between operating system users and database system privileged users, preventing operating system users from performing unauthorized SQL Server database management.
Specific operation:
- Expand the server group, right-click the server, click Properties in the context menu, and in the Security tab select "SQL Server and Windows Authentication mode" for server authentication.
- In SQL Server Manager -> Security, select account
BUILTIN\Administrators, right-click Properties, and under Status set "Deny permission to connect to database engine" and "Disable login".
Enable Log Auditing
The database should configure logging to record user logins. The recorded content should include the account used for login, whether login succeeded, login time, and the IP address used by remote login.
Specific Operation
- In SQL Server Manager -> right-click the server -> Properties -> Security, select "Both failed and successful logins" for the audit level.
- Ask the database administrator whether third-party tools or other measures are used to enhance SQL Server logging. If yes, check whether these audit records meet classified protection security audit requirements.
Set Connection Protocols and Listening IP Range
Set the connection protocols allowed by SQL Server, and bind IP addresses for TCP/IP listening ports to restrict unnecessary remote client access to database resources.
Specific Operation
- Open SQL Server Configuration Manager from the Start menu, expand SQL SERVER 2008 Network Configuration -> Protocols for SQL SERVER, and disable unnecessary protocols on the right, such as VIA and Shared Memory if they are not needed.
- In the same interface, double-click the TCP/IP protocol -> IP Addresses. If unnecessary IP items are listening, set the Active property to No. For example, if the database application is installed on the same server, it only needs to listen on
127.0.0.1; other IPs do not need to listen. Configure the application to access the database through127.0.0.1.
Configure Login Terminal Idle Timeout Lock According to Security Policy
- Open SQL Server Management Studio from the Start menu, then expand Tools -> Options -> Designers -> Analysis Services Designers. Under Connection, enter an appropriate number in "Connection timeout value" (default is 15).
- In the left side of SQL Server Management Studio, right-click the server name -> Properties -> Advanced. Find "Remote login timeout" on the right and set it to an appropriate number. Under Options -> Connection Properties, set the connection timeout value to a larger number (default is 20).
Hide Instance
Prevent database system information disclosure.
Specific Operation
- In SQL Server Configuration Manager, select Protocols for MSSQLSERVER under SQL Server Network Configuration, right-click Properties, and enable the Hide Instance option.
Change the Default Port
Modify the default communication port to prevent attackers from logging in to the database server through 1433.
Specific Operation
- In SQL Server Configuration Manager, select Protocols for MSSQLSERVER under SQL Server 2005 Network Configuration, select TCP/IP, right-click Properties, and open the IP Addresses tab in the TCP/IP Properties dialog.
- Change all TCP Port fields to the new desired port number. The default port is 1433. Restart SQL Server for the change to take effect.